

Keen to explore the land of the Kiwis? You’re not alone. Almost four million people made the journey to the tiny island nation in 2018.
But even though the country appears tiny by international standards, it’s larger than the United Kingdom – and that means a lot of jaw-dropping scenery to cover in single trip.
But never fear, potential-future-honourary-kiwis! This guide will cover everything you need to know to see the most spectacular sights in the country including:
- How long to spend in New Zealand
- How to get around New Zealand
- North Island
- South Island
- Got more time? Check out these bonus trips:
How long to spend in New Zealand
So how long do you need to see the best of this island nation? New Zealand is divided into two islands, the North and the South. You’ll need at least four weeks to cover both, and that’s moving at a pretty steady pace.
If you can only afford two weeks, consider scaling it back to one island, in which case it’s generally agreed that the South Island is even more beautiful than the North.
But with so many places to see, and all of them spread so far and wide, it’s important to spend your time wisely. And with so many itineraries on the internet, it’s dizzying and intimidating to figure out where to go and when.
This was precisely the problem we encountered when we started planning our New Zealand trip.

With just over four weeks in the country, we wanted to make sure we saw the best of the best, the crème de la crème, the fluffiest sheep in the flock.
We combed through some of the best itineraries we found across the web, crunched the data on the similarities, and then made up our own version of events to hopefully see the best New Zealand had to offer. But first, a few housekeeping thoughts:
How to get around New Zealand
You’ve got a lot of ground to cover, so having your own transport is the best, although not only, option. A lot of people choose to discover New Zealand in a campervan — and for good reason.
With a certified self-contained campervan (noticeable by a little blue sticker on the exterior) you can freedom-camp where you want. We originally had a ‘plan to van’ — until we checked out the pricing. We found that it was far cheaper to rent a budget car and book accommodation than rent a campervan for a month.
There are also options to take advantage of campervan relocations — these are offered by companies who need to get one of their campers to a different location for sale or rent.
Some of them come as cheap as a few dollars for the rental, and others may even cover some petrol or ferry crossing fees — it all depends how desperate the companies are.
A downside to this option is that you have a deadline to get to your destination, so less time to chill and explore. But, if the stars align these could be a penny-saving experience!

With the topic of car versus campervan also comes petrol: it aint cheap to fill up your car in New Zealand.
As of July, 2023, the average petrol prices in New Zealand fluctuated anywhere from $2.32 a litre to $2.61. That’s almost a full dollar more than when we travelled in 2019 and that was already expensive. Bottom line: don’t forget to budget for fuel if you’re driving a car or campervan.
If you’re not keen to drive yourself around, that’s okay. There’s lots of public transport options around, or we even met a Dutch guy who was hitchhiking his way through the country. “But we don’t see any hitchhikers on the road,” we said to him.
“Because they get picked up very easily,” he laughed. Ohhhhhh.
Where to stay in New Zealand
We wanted to see as much of New Zealand as possible without breaking the bank — it’s definitely not a cheap country to travel.
That meant cooking as much as possible, and cutting costs on accommodation. Normally, this would mean hostels or similar, but we found that Airbnb in the country was ultra-prevalant and surprisingly affordable (assuming you’re 2+ people). You might not get an apartment to yourself, but do you really need more than a room? Plus, Kiwis are ridiculously friendly people!
If you’re travelling on your own, hostels will probably still prove to be the most wallet-friendly option.

If you’re coming over the high season, between November and March, you’ll want to book your accommodation in advance. Rooms sell out in some areas very quickly and anything that remains skyrockets in price.
How much to budget when travelling New Zealand for 30 days
To reiterate: NOT A CHEAP COUNTRY. We went with the expectation that it would be pricey and still ended up spending more money than we thought. For a rough idea of budgeting, check out below:
| ITEM | NZD & AUD | EUR | USD |
| Campervan (self-contained) p/day | $150+ | €85+ | $955 |
| Airbnb Double Room p/night | $80 | €45 | $50 |
| Supermarket Meal (for two) | $20 | €12 | $13 |
| Basic Restaurant Meal (for two) | $50 | €30 | $34 |
| Beer | $8 | €5 | $5 |
| Sim Card with 20GB Data | $80 | €48 | $53 |
| Car Hire p/day | $30 | €17 | $19 |
An average day tour can cost anything from $90 to $300 NZD – but remember to budget for these to make the most of your time in the country! You can often pick up good deals for tours and activities on BookMe.
And now — to the itinerary!
North Island
Day 1 & 2 – Auckland

You’ll land in New Zealand’s largest international airport, and in the city where over a third of the New Zealand population live.
However, we don’t recommend spending too much time here, because truthfully, once you’ve seen one, big, first-world city, you’ve seen them all. And while Auckland is certainly beautiful as far as big, first-world cities go, there’s so much more to explore in NZ.
Depending on your flight schedule, by the time you get through immigration, customs (which is understandably pretty full-on given New Zealand’s status as an island-nation), collected a hire car, and made your way to your accommodation, you may have already blown your first day. Which leaves you with one full day to see the rest of the city — a surprisingly manageable feat.
To start, take a drive through Auckland’s winding city streets to Mission Bay, a stunning old-world beach suburb just minutes from the skyscrapers that dominate the city.
Here, the vibe is slower and the roads are filled with cafes and eateries overlooking the nearby beach. Unfortunately, there is already evidence of this suburb being overtaken by tourism and big business, with Starbucks and The Coffee Club taking up two prime positions.
Regardless, it’s worth a drive out to sit in a nice café, see the waterfront, and feel the sand exfoliating your wearily travelled toes.
Just a short drive around the corner is the city’s SEA LIFE aquarium, which, if you are an aquarium person, is fantastic. If you’re neither aquarium people (nor anti-aquarium people), across the road from their car park offers some pretty great city skyline views.
Next on the list for the day is Mount Eden, and this is a must-do when visiting Auckland. It’s just five kilometres from the city centre in the leafy, upper-class suburb of Eden, which is aptly named because it’s stunning. A short uphill ascent will take you to the top of the fifty metre crater that was left from the last eruption 15,000 years ago.
From here, you’re treated to 360° views of the surrounding city, including the Sky Tower which is the pinnacle of the Auckland skyline. Let’s be honest: why would you pay $32 NZD to go to the top of a metal tower to see Auckland without its prime attraction, when you can sit on top of a beautiful natural beast of a mountain, feeling like a boss at the top of a grassy volcano with a complete skyline?
That’s all for your Auckland adventure, but don’t stress: let’s get on to the good stuff!
Day 3, 4 & 5 – Paihia and The Bay of Islands
Bay of Islands – sounds like a dream, right? Or a video game level, but I’m cool with either. And believe me, you will be cool in any of the small, beachside town along this peninsula. We chose to stay in Paihia because of its laidback vibe, cool bars, and proximity to the harbour. But fair warning, it’s not an easy trek – a three-hour drive from Auckland on a hairpin bend highway will do the trick – but boy is it worth it!
To start your time in the Bay of Islands after a much deserved rest, take yourself on a self-drive tour of some of the sights. Here, you can finally see the real New Zealand. I’m underlining that because it’s pretty cool to see.
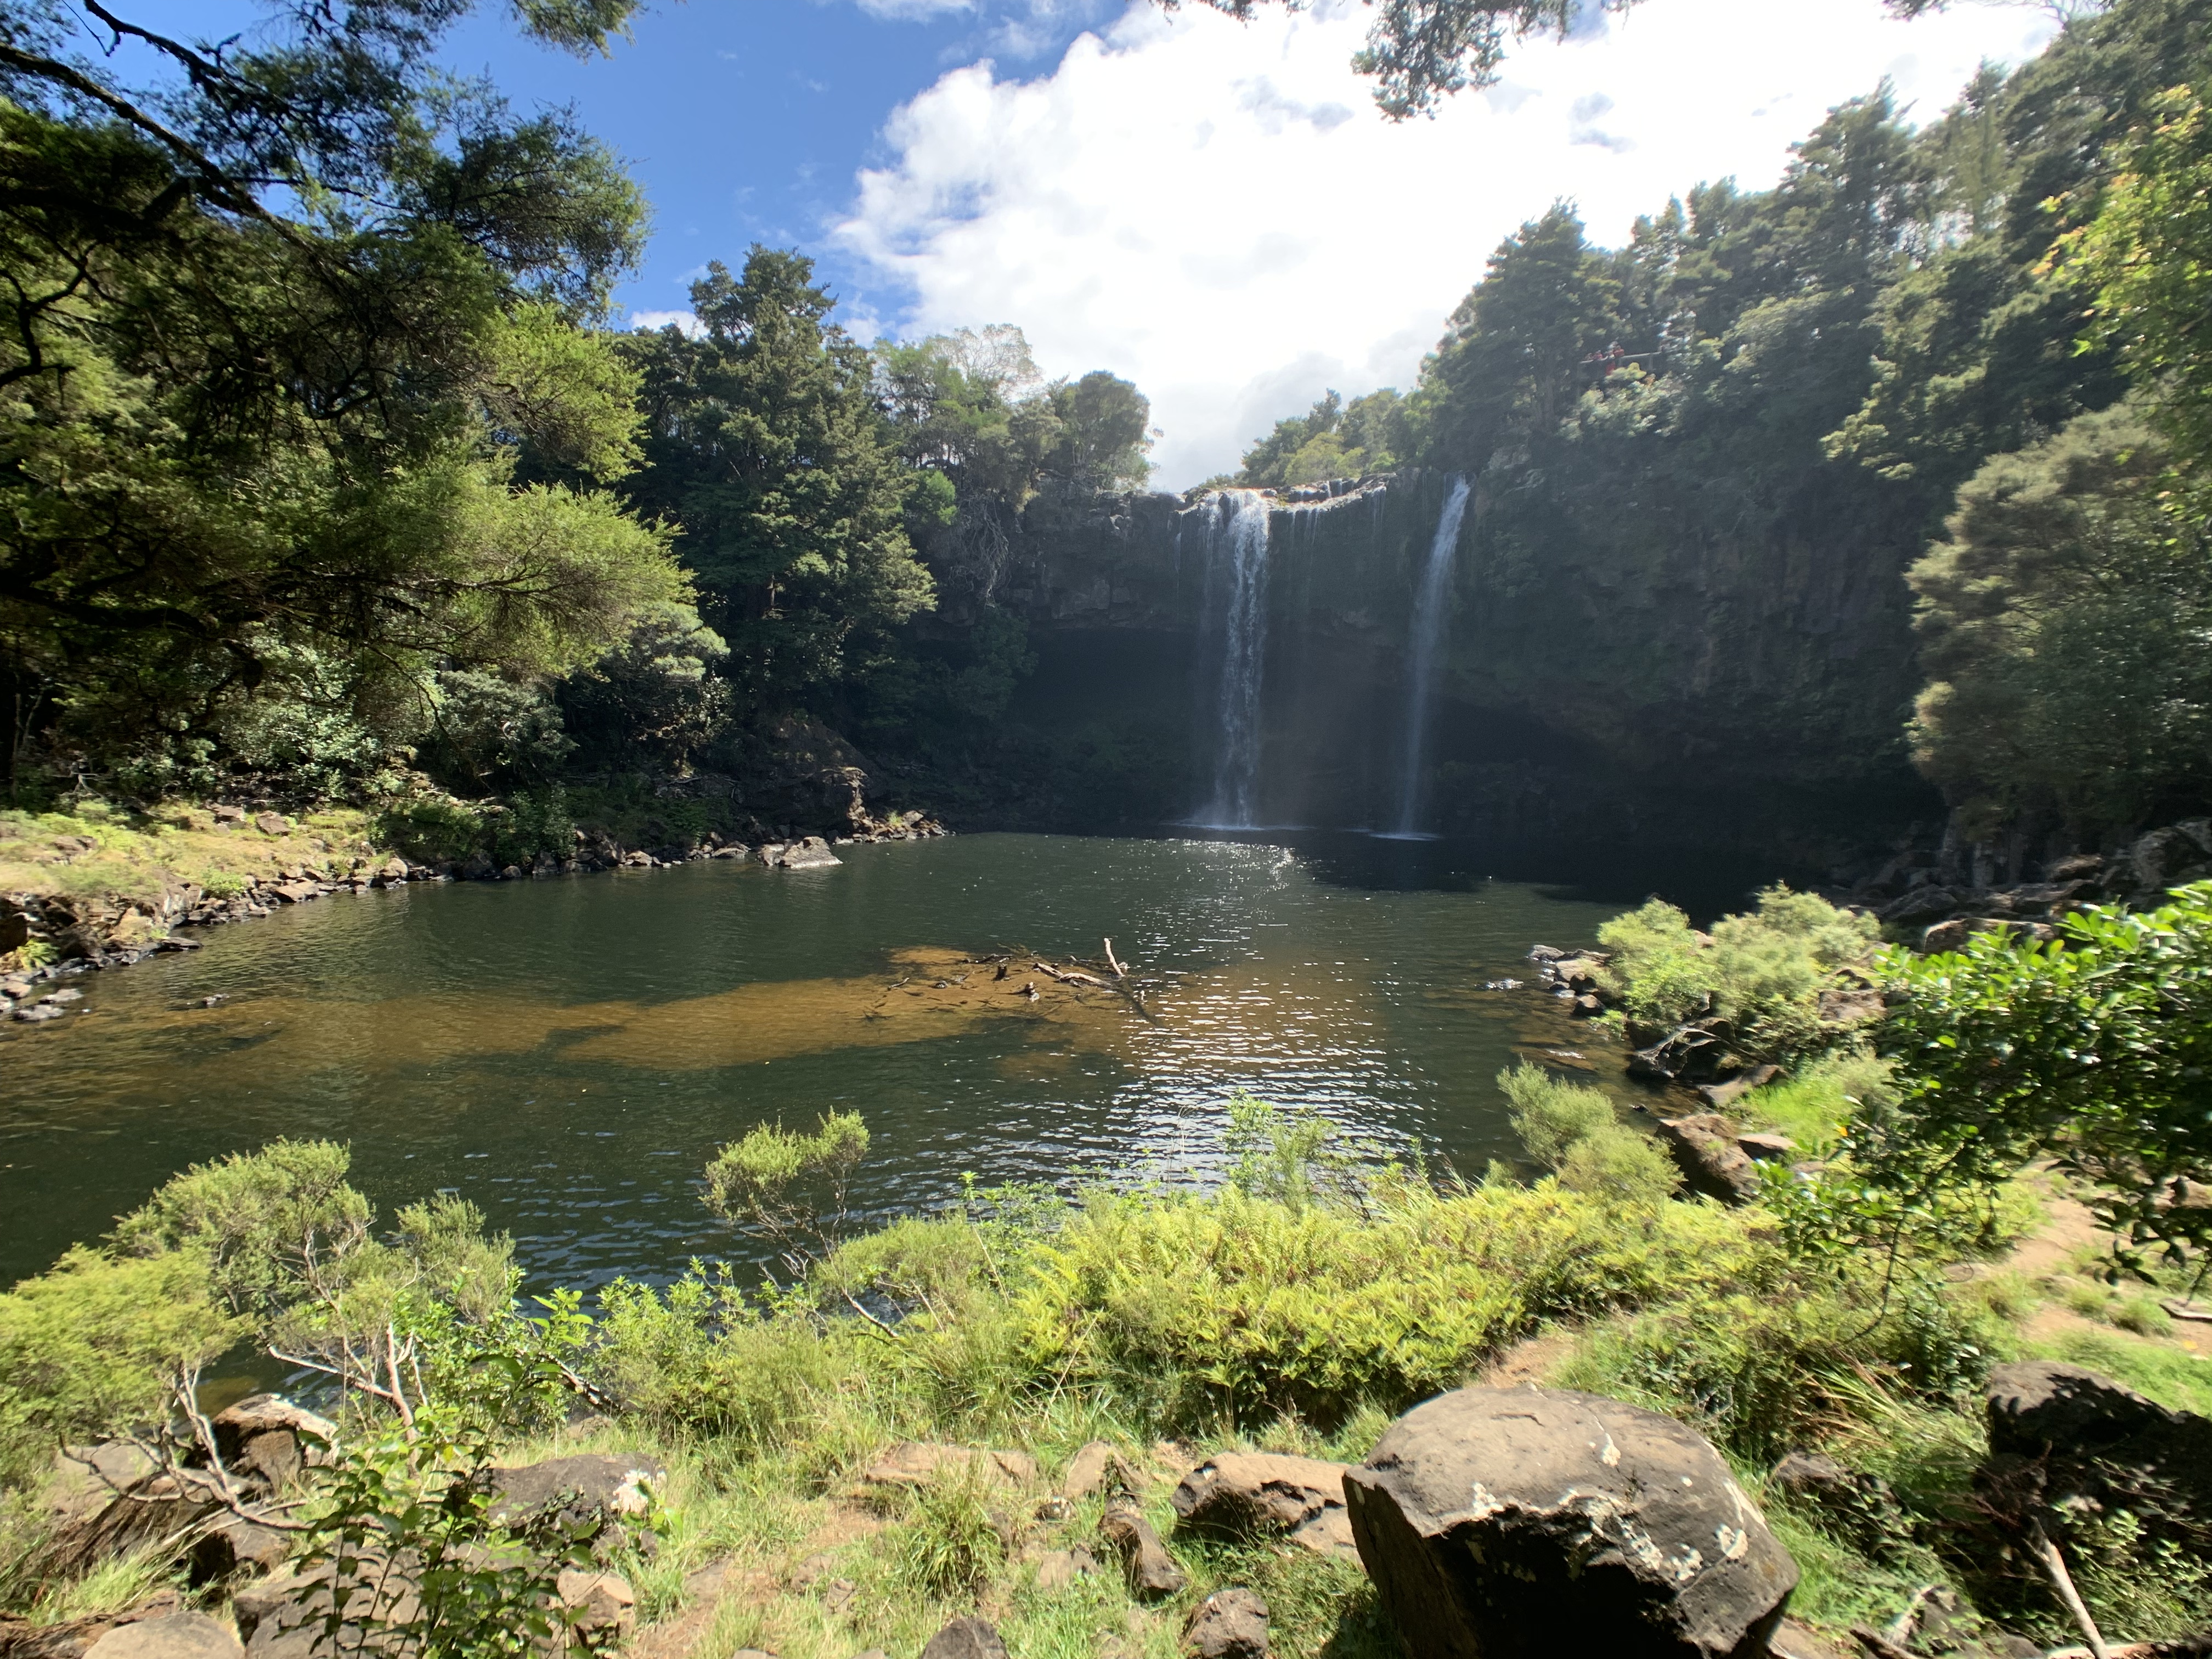
First stop on your trek is Rainbow Falls, a pretty well-worn mark on the tourist map. This is a spectacular waterfall that cascades 27 metres to a pool below. It’s close to a nearby car park, and you have the option of trekking a short path to the bottom of the waterfall as well, and then continuing a trail-walk from there. The views here are phenomenal, and the air smells so super clean – it’s definitely worth checking out.
Next stop was hands down our favourite. Charlie’s Rock is another half-hour out, and can be a little difficult to find – which is why it’s primarily favoured by the locals. Here are some instructions to make your life easy:
How to get to Charlie’s Rock:
- Search for Waipapa Landing boat ramp on Google Maps, and park in the parking lot.
- From here, cross the road (but don’t cross the bridge) and walk less than one hundred metres to a small white sign that say “Welcome to Charlie’s Rock Walkway”
- Walk about ten to fifteen minutes along a track (you’ll have to hope a step over a fence at one stage) with a small rock scrabble at the end.
Your reward? A swimming hole straight out of an Enid Blyton novel. Charlie’s Rock is a huge natural pool with a commanding waterfall on the other side. Spend your time lazily swimming, showering in the waterfall, or baking on a rock in the sun – you will not be disappointed.

Another half hour in the car will take you to your third and final spot for the day – Ngawha Hot Springs. You’ve probably heard of New Zealand’s famous hot springs before, joining the likes of those in Iceland, Japan and Chile. While the Ngawha Hot Springs can’t be mistaken as luxurious, these basic baths are definitely relaxing and peaceful after a long day of tramping around NZ.
I’ll be honest: these pools don’t look, or smell, appealing. They have milky white, dark green or inky black water and a constant smell of sulphur hanging around, but they will ease your tired muscles and may even heal you spiritually as well – you never know.

Legend has it that Kareariki, an ancestress of the local Maori, discovered the pools and their healing benefits. At another point in time two warring tribes relaxed in the springs after a lengthy battle – together! The pools are very special for Maori people, and each of the pools have a different name and temperature, with some cold, and others reaching up to fifty degrees.
The following day could be your favourite day in New Zealand – take a boat tour to explore the area. If you’re a backpacker, you may not be one for tours. But unless you’re particularly proficient on a boat on your own, you may like to take a tour to see some islands in the Bay of Islands.
There are a myriad of tour operators around, all whom will take you out for a variety of hours to see the sights. There are a few larger companies who go off in search of dolphins on large cruisers and pack a hundred tourists on a boat. While the idea of seeing dolphins is definitely appealing (you can even swim with them for an extra fee if the on-board environmentalist gives the go-ahead!), we weren’t super keen on the idea of disrupting the wild creatures for a good insta-photo. Also, these tours, when you factor in the dolphin swim could also be almost twice the price of some of the other more independent operators.
We can recommend She’s a Lady, who offer island sailing adventures on a stunning sailboat. I’m no boat aficionado, but this was a beauty. Our small tour had less than twenty people onboard, cost only $100NZD. You’ll go out on a full day sailing where you can help sail the boat, moor on an almost deserted island, paddle on kayaks with a see-through bottom, snorkel, swim, and enjoy a picnic lunch. You may see dolphins, fairy penguins, and stingrays while on board, and your guide will give you heaps of information about all the surrounding areas.

Other sailing companies do take you to more islands, and also out to the Hole in the Rock, one of the main attractions in the area, so just weigh up your preferences while taking into account cost, group size, time spent on the excursion (some are pretty short!), inclusions, etc.

After docking back on Bay of Islands you’ll probably be exhausted – sailing is hard work! Treat yourself to some fish and chips at Vinnie’s, which is right on the main drag and offers cheap and cheerful “fush and chups” for the New Zealanders. If you’re a fisher, the owner will even cook your catch for a small fee!
Day 5, 6, 7 – The Coromandel
I’m not going to sugar-coat it – Day Five is mostly a drive on this itinerary. It’s about five-and-a-half hours to get from Paihia back through Auckland, and then up into the Coromandels, which is another stumpy peninsula on the North Island. The last part of the drive is also particularly curvy – but the views are 100 percent worth it.
The main attractions in this area have provoked the nearest town, Hahei, to become a tourist town – however, with tourist towns comes the tourist cost and we found that all the reasonably priced accommodation in these areas booked out fast. If you have a car, save your pennies and stay in nearby beach town and suburbia Whitianga instead. Whitianga has its own beach named Buffalo Bay – and the locals say it’s one of the best beaches in New Zealand.

Spend a day seeing the two main sights in this area. Stop One is Cathedral Cove, an iconic rock archway and looming cliffs surrounded by beautiful bays. There are a few ways to access this natural wonder, including by motorboat, water taxi, kayaking, or even swimming or snorkelling. But, we would highly recommend taking the scenic walk to enjoy the spectacular views over the surrounding water. As far as you can see will be the ocean, stretching into the horizon and interrupted only by the odd island jutting from the water.
While Cathedral Cove has the luxury of parking at the top of the walk in the winter months, during the Summer the top car park is closed and everyone needs to park in the town centre. A Park and Ride bus operates from here to the starting point for $10 per person return.
You can definitely walk from the car park to the starting point, but it is up a VERY steep hill. Lots of people do this though, so don’t be afraid, but know it will be a rather strenuous start to your journey. We were looking to save a quick few bucks so opted for this route – but then got picked up by some friendly kiwis who happened to be driving up the hill and offered us a lift! Gotta say, when we say the hill we had in front of us we were relieved!

The track is advertised as one hour and thirty minutes return, but can be done in far less. You should have a reasonable level of fitness for the excursion, take heaps of water, and definitely bring your bathing suit for a quick dip in the crystal clear waters! There will be heaps of other tourists around which is fine, because there is more than enough beautiful bay to see and enjoy.
After experiencing the wonders of Cathedral Cove, take some time out in one of the nearby cafes with a cold drink – you’ve earned it! Plus, it will help you kill time until your next adventure: Hot Water Beach.
Hot Water Beach is aptly named. No, it’s not the crashing waves that are hot (because that sounds terrifying). Rather, geothermal activity warms the sand in the area, resulting in a rather unique attraction: the ability to dig your own geothermal baths.
To get there, there are heaps of signs, or you can Google Map ‘Hot Water Beach’ and the magic of the internet can guide you. There is a paid parking lot right near the hot section, or you can take the first parking lot for free and walk 300 metres or so to geothermal area. Now, this next part is super important so read carefully and learn from our mistakes.
- You will only be able to dig your pool and experience the hot water in a certain area at a certain time. Locals say it’s about two hours either side of low tide – you can find tide times here.
- You will know where you can dig your hold because there will be a bustling hub of tourists congested into an area of the beach no bigger than a basketball court. Now, you may think that just being close to the group will give you the hot water beach experience of your wildest dreams, but you would be wrong.
- There is a very simple way to find where the geothermal water is running underneath – the sand will be warm to your feet.
- Don’t forgot a spade! Your accommodation will likely have one for you to borrow.
We made this mistake – big time. The first hole we dug was too far away from the waves, forcing us to dig very deep, and find just cold water at the bottom (I’m not kidding, the hole was almost up to our waist). Our second hole was closer to the water but on the outskirt of the crowd – and not where the sand was warm. Our third hole was in the crowd, but still not on warm enough sand. When we finally decided to get smart and Google it, we found it was super simple and you just had to be okay with getting up and close with the people around you. We dug in the only small spot available, and voila! Hot water. Actually, too hot. Ouch, this is really – BURNING OUCH OUCH OUCH, GET IT AWAY FROM US.
Turns out the hot water at Hot Water Beach is – surprise, surprise – hot. In fact, it was so hot that even after trying to get some sea water in there as well we just gave up on our bath and decided to go for a swim in the ocean instead.
Days 8 & 9 – Rotorua
Gun up the engine, and get back on the road. While Rotorua will be your final destination today, this is the perfect chance to check out Hobbiton. This purpose-built movie set for The Hobbit movies really can’t be missed, despite its hefty price tag. Your entry ticket gets you on a guided tour where the real scenes were filmed, heaps of fun facts about the filming process, and even a (non-Hobbit sized) beer at the end!


Seeing the hobbit holes is an awesome experience even if you haven’t seen The Hobbit or The Lord of the Rings movies or read the books. The tour takes around two hours and cost about $84 NZD for an adult ticket. While we held out on booking our tickets for ages to see if a deal came up, deals are actually very rare – so just book it in advance because the tours do sell out, particularly in the summer.
TIP: Our tour guide told us the best time to come was on the first tour of the morning so you have an empty site to take pictures of! If you’re a die-hard fan you may also like to take their evening feast option, which sounded delicious.
For the next two days, explore the magestic city of Rotorua. While it has a comparably small city centre to most, it’s steeped in history and culture from Maori traditions, stunning and unique natural scenery and super-friendly people.
To see a living Maori village check out Whakarewarewa, where the Tūhourangi Ngāti Wāhiao people can trace their ancestry back almost 700 years. The actual name of the town is Te Whakarewarewatanga-o-te-ope-a-Wāhiao and you should definitely ask one of the residents to say the full name while you’re there – if you have some time to kill.
After exploring Te Whakarewarewatanga-o-te-ope-a-Wāhiao, you can take a cute forest path through some absolutely dynamic geothermal pools. You can find cheap tickets for this on BookMe, or if you book via their website you can get 10% off.

If you happen to be in Rotorua on a Thursday, head into the city for the weekly night market. Do not plan to eat before or after you go, because the food here is amazing, and you will definitely find yourself wanting some pastries or baked goods to cram in your bag when your stomach is stuffed full.
The other main highlight of the area is exploring the whimsically bright colours of geothermal activity. While there is a plethora of choices, we put on our walking shoes for Wai-o-Tapu Geothermal Wonderland. Spend a few hours completing tracks that will lead you to the most out-of-this-world experiences – colours that seemed radioactive, pools that would bubble freely, layers of earth that have crumbled and been reborn.


Day 10 & 11 – Taupo
Pack your bags in Rotorua and hit the road – today you’re heading to Taupo. While you may be fooled into thinking this is a seaside town, it’s actually a vast lake by the same name. Taupo is a pleasant surprise, with cheap accommodation, green parks, and friendly locals. But the major attraction that brings people here is the Tongariro National Park, about an hours drive away. Here, you can tackle New Zealand’s best one day walk.


The Tongariro Alpine Crossing weighs in at just under 20 kilometres. For between six and eight hours you will cross bushland, mudflats, feel the burn in your thighs from the Devil’s Staircase, swear you are on Mars as you cross former volcanic craters, scramble and slide out of control down loose volcanic rock, see sulphuric lakes of incredible colours, trek zig zag paths down mountains, and breathe in the smell of the rainforest. Check out our full guide on the walk, because this is definitely something to plan for.
It’s easily the most diverse track you are likely to come across, absolutely stunning, but also offers an imposing challenge – it’s also without a doubt the one thing you should do when you go to New Zealand. The aches and pains that you will feel in the days after completion are your trophy for your hard work.
Day 12 – Waitomo
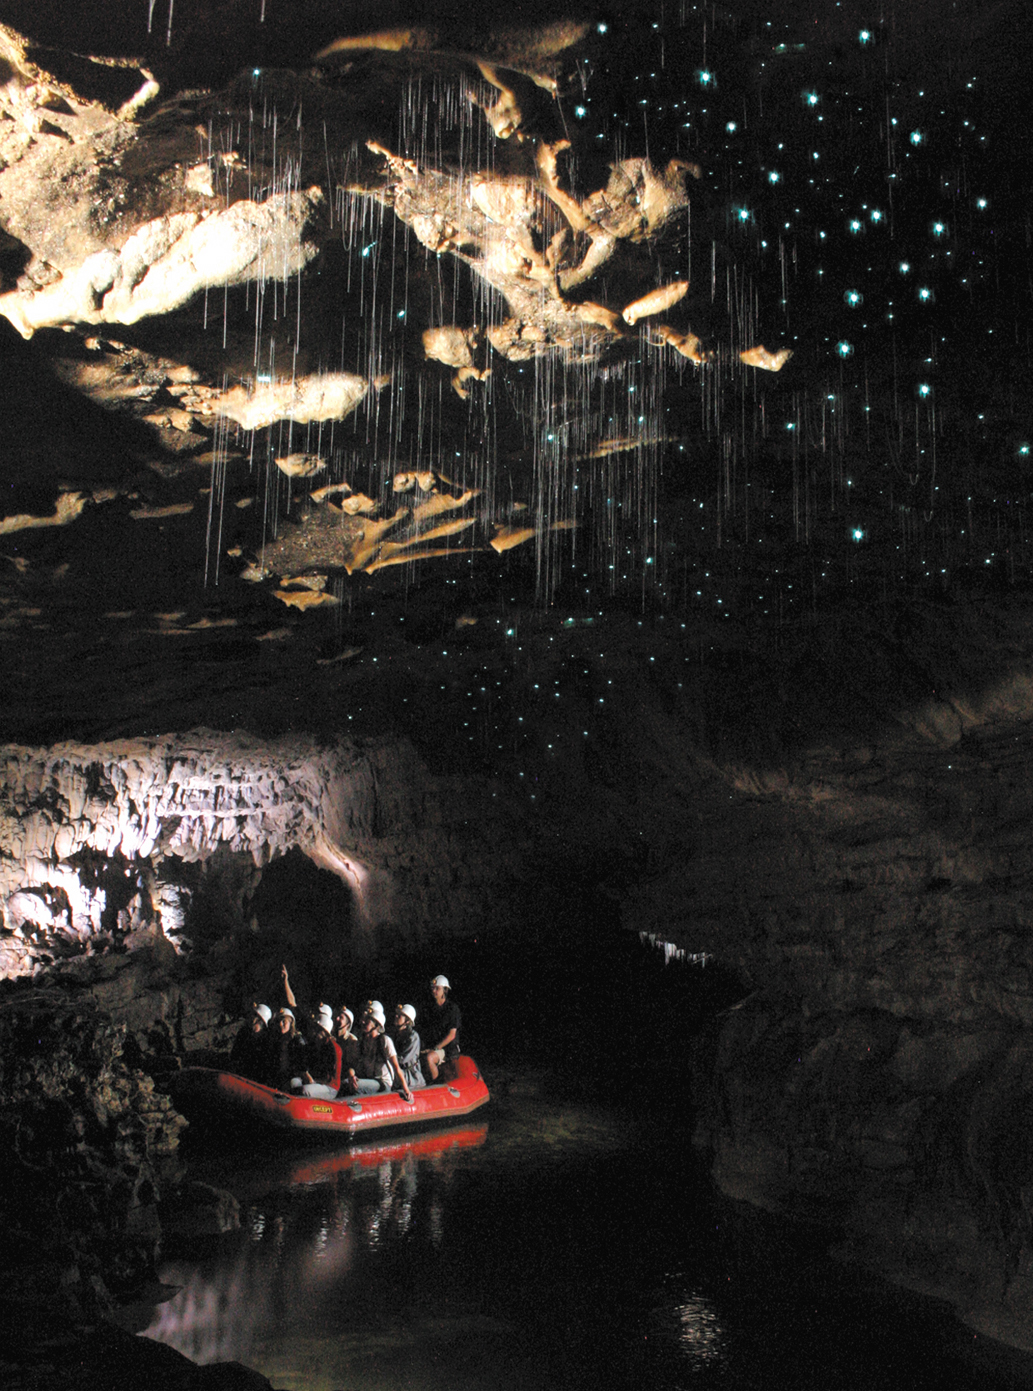
Time to begin making your way back north to Auckland, but first swing your car west, to Waitomo. Waitomo is highly regarded as one of the best places to see glow-worms in the world. Why do you want to see some illuminated insects? Instead of thinking of them as creepy-crawlies, think of them as the worlds most natural fairy lights.

Choose a small tour for this beautiful journey – our choice was Spellbound Glowworm and Cave Tours. Their tours are capped at twelve people, and offer a gentle, silent journey down a cave river on a boat. You’re encouraged to sit back and enjoy the enchantment of thousands of lights around you in the otherwise complete darkness. As you glide down the river, you’ll feel like you’re immersed in the milky-way. It’s an incredible experience, and definitely not one to be missed. You also visit a second cave, which is dry, and you’ll emerge blinking in the bright sunlight full of knowledge and inspiration about caving.
The largest glowworm business in Waitomo is Waitomo Glowworm Caves, which are a huge tourist operation. It has decent reviews, but gives you less time with the glowworms itself – solid if you you’re running on a tight time or money budget, but, if you can, splurge on an independent tour instead.
For this evening, book accommodation between Waitomo and Auckland. We chose to stay in Morrinsville, which is a little town with not much going on, but the accommodation on AirBnB was super cheap – and it split the long drive to Auckland over two days, which was widely welcomed.
Day 13 – Travel to Christchurch
This is a travel day, so make the most of it! Finish your drive back to Auckland, catch up on your correspondence, trim your nails. We returned our hire car in Auckland and hopped on a flight all the way to Christchurch. Stay in Christchurch this evening so you can start the next day fresh.
South Island
Day 14, 15 & 16 – Christchurch
Welcome to Christchurch! This funky city had to rebuild around 70 percent of its central buildings after a series of devastating earthquakes in 2010 and 2011 destroyed much of the city and killed 185 people. Much of the city is still under construction and things are starting to get back on track. You’ll notice the Christchurch spirit – even after the country’s deadliest massacre in March 2019 and the earthquakes prior, the community really bands together instead of calling fault.

The city’s buildings are now a mix of old structures that survived, buildings that still remain in ruins, and shiny modern constructions. There’s a huge street art scene in the city, so go ahead and try and find as many great murals as possible. Refuel at one of the many trendy cafes, or have a burger and fries flown at speeds of 100 kilometres an hour via pneaumatic tube at the retro C1 Espresso café in the old post-office.
Check out the very cool Gap Filler projects, where you can move a giant joystick to play a videogame on a billboard screen, activate an outdoor dance-floor with lights and sound and your own music, or play large-scale repurposed musical instruments in a garden. If city life isn’t so much for you, head for the hills and enjoy a leisurely coastal walk on the outskirts.
Day 17, 18 – Arthurs Pass & Greymouth
Leave Christchurch in your rearview mirror and start your journey cross-island to the west coast. This lengthy drive will pass in a flash when you reach the amazing scenery of Arthurs Pass, a national park and main highway with breathtaking sights – mountains erupting from the ground, expansive fields, and quirky brushy-bushes dotting the hills. Leave yourself some time and make sure you enjoy some of the hikes along this road to break up your day: Devil’s Punchbowl Waterfall is an easy one-hour walk through lush forest to a spectacular water feature.
Stay in Greymouth for the evening for reasonably priced accommodation and easy access to some of the areas great sights. On the second day, make your way north to Punakaiki, otherwise known as the Pancake Rocks. Scientists don’t actually know how these curious rock formations occurred, but they do look delicious! They’re situated right by the sea, so expect some incredible views and some amazing water shows courtesy of the nearby blowholes.

Continue your way up the coast, and check out the RIVER WALK? CHECK MAP. Another drive will take you to Cape Foulwind, which despite what the name implies is actually a very nice place. Head out to the water edge and find a huge seal colony basking on the rocks and playing in natural pools. You can sit for hours and watch the slippery creatures sunbathing and doing tricks.
Day 19, 20 – Franz Josef
Franz Josef is a tiny town on the West Coast home to a massive attraction: Franz Josef Glacier. This glacier is a remnant of the last ice age, and is decreasing more and more every year, so see it while you still can. A short one-and-a-half hour walk will talk you to a point where you can view the iciness in all its glory, or take a helicopter ride or heli-hike if you’re feeling a bit baller.
There used to be a second glacier in the nearby Fox River township, but a landslide in November 2018 cost half a million New Zealand dollars to fix – before another occurred just three months after it was repaired. Now the road leading to Fox Glacier is closed indefinitely while they figure out the future of the very instable road. You can still reach it by air though!
In your extra time in Franz Josef there are heaps of other things to do. A drive to Fox River will give you access to Lake Matheson, one of the most iconic views of Mount Cook in the country. On a clear, still day you can see a perfect reflection of the mountain in the lake – spectacular! Even if it’s not a clear, still day it’s still a gorgeous forest walk, so don’t be too disappointed if you don’t get that perfect Instagram shot.
If you’re seeking some R&R, a visit to Franz Josef Glacier Hot Pools may be just what the doctor ordered. These are three hot pools, ranging in temperature from 36-40 degrees in a landscaped setting, or you have the option to enjoy a private pool. While it’s a pretty pricey swimming experience at around $28 NZD for public entry, you may pick up a good deal on BookMe for about $20.
Day 21, 22, 23 – Queenstown
Welcome to Queenstown! This quaint but bustling town is a tourism hotspot, and it’s likely you’ll find more foreigners than New Zealanders here. But don’t miss it, because this place is not only the adventure capital of the country, but has a super cool vibe, amazing stores, heaps of busking activity and heaps of good food. It’s also super beautiful!

You’re spoilt for choice of activities in this location, so pick whatever takes your fancy: skydiving, bungee jumping, jet-boating, cycling, mountain biking, rope-swinging, or become a human slingshot. If you’re looking for some more relaxing activities, take a sky-gondola up to Bob’s Peak for amazing views over the rest of the town, set out on one of the scenic hikes, or wander through Queenstown Gardens right near the edge of town – it has a pretty amazing playground that will bring out the inner-kid in any adult (including a rope swing over a creek!). Or, head out on a day trip to Arrowtown, a beautifully preserved historic town only half and hour drive away, that also plays host to some cute bakeries, restaurants, parks, and shops!

There are heaps of design shops in Queenstown, and if you can wrangle it in your itinerary make sure you are there on a Saturday for their Queenstown Arts Market. If not, make sure you check out The Bead Shop for jewellery handmade in-store, or Vesta Cottage with New Zealand style gifts in the oldest house in the town.
Day 24, 25 – Dunedin
Swing off to the southeast of the South Island to Dunedin, an old Scottish outpost in the country. This is the South’s second-largest city, and the architecture is like nowhere else in New Zealand. It’s also primarily a student city, with great vibes around the downtown area, a bustling music scene, and spectacular nearby nature.
To enjoy a cocktail with a twist, navigate your way to Pequeno, a bar only accessed through an alleyway or secret door with a huge array of spirits and an interior that will make you feel like you’re hiding in a speakeasy. Or, to get your craft beer and tapas fix head to Ombrellitos, where you’ll be well taken care of.
Take a drive out on the winding peninsula roads to get to the starting point for the Sandfly Bay Track. This short but challenging track is well worth it when you reach the beach and find all the wildlife around: we saw two sealions and multiple seals basking on the beach or rocks. Keep your distance and enjoy these super-cool animals in their natural habitat.
As a final spectacle in Dunedin, give your thighs a workout and head to the steepest street in the world! Baldwin Street has the honour of the title, and groups of tourists make the trek each day. Careful not to lose your balance!
Day 26, 27 – Te Anau and Milford Sound
Your next stop will be your southernmost point on this journey. Te Anau will be your base stop for exploring Milford Sound, the eighth wonder of the world and a must-do if you visit New Zealand. Te Anau is the closest township, although Milford Sound is another two hours drive away – but it’s an incredible one.

We chose to do a tour for this day, and had luck finding a discounted one through BookMe with Southern Discoveries. Doing a tour for this kind of activity is 100% percent worth it – without it you will be driving four hours throughout the day and concentrating on the roads instead of the sights, paying for a cruise, and missing out on local knowledge. We enjoyed this day so much we wrote a full post on it, check it out!
Day 28, 29, 30 – Lake Tekapo & Mount Cook
Lake Tekapo is one of the most beautiful and pristine places we had a chance to visit on our journey – it also comes after a long, but increasingly scenic drive. As you go, incredibly crystal blue lakes will appear on your left-hand side, guarded by a backdrop of mountains, along with plenty of spots to stop and get some incredible photos.

The area is not only famous for its namesake lake, but also for stargazing and astronomy. It’s located in the Aoraki Mackenzie International Dark Sky Reserve, which means the views of the stars are some of the best around. Hop on a stargazing tour while you’re here, and see a night sky like nothing you’ve seen before. You can even combine it with a soak in a hot pool while floating on a water hammock!

Save one day to do a trip out to Mount Cook – it’s just over an hour drive away but has some absolutely unmissable day walks. The Hooker Valley Track is a favourite, encompassing three hours of incredible swinging bridges and alpine scenery before reaching the Hooker Glacier Terminal Lake. For a few shorter walks, check out the Tasman Glacier View Track, with a view over a glacier – and in the summer you can see icebergs that have broken off and are left floating in the lake!
Got more time? Check out these bonus trips:
Whale Watching in Kaikoura
If you can wrangle one extra day for your holiday, before flying out of Christchurch take a day trip to Kaikoura. This is the whale-watching capital of New Zealand, and Kaikoura Whale Watch guarantee you will see a whale – or you get 80% of your money back.
While at first we were hesitant as to whether it was worth the hefty price tag ($150 NZD per person) and the 2.5 hour drive each way, it turned out to be on of the best moments on our New Zealand trip!

Your boat journey will take you out onto New Zealand’s continental shelf, where whales swim freely in the water. On our trip we were lucky enough to see a sperm and a humpback whale – and a pod of over 200 dolphins!
Wanaka
Why not Wanaka? Commonly referred to as Queenstown’s little sister, Wanaka is another hub of adventure activity set on a lake. We didn’t make it here on our trip, but we wish we could have!
Wellington
If you decide to take the ferry instead of flying from the North to the South Island, you’ll end up in Wellington, New Zealand’s capital city. From what we hear, Wellington boasts adorable architecture and an amazing craft scene.

That’s it! New Zealand is such a bucket-list destination full of absolutely jaw-dropping scenery, super friendly people, and experiences that will stick with you for a long time. Got any other tips, tricks, or even questions? Drop them in the comments below!
